
Lose the Feedback
Have you ever experienced a case of microphones squealing feedback? Even with great mics, a good system, and a smart layout, what happens when you still need more gain-before-feedback for a source? We’ll use choir miking as our example, but the physics apply to microphones in all sound reinforcement applications.

In sound reinforcement, we usually mic choirs with several cardioid condenser microphones. The feedback that occurs is caused by the microphones hearing themselves amplified in the PA system, creating a feedback loop. As the amplification recurs, squealing occurs when positive loop gain is reached and exceeded. Each mic picks up the source (choir) in front of it and also picks up itself coming out of the PA (bad). The specific frequency or frequencies that ring are a function of various resonances in the electronic components, room acoustics, directional properties of the mics and loudspeakers, and the specific distances between them. Since we want our mics to “hear” less of themselves from the loudspeakers, several ideas seem fairly straightforward for increasing gain-before-feedback (GBF):
1. Turn it down
2. Use fewer microphones
3. Use directional mics aimed at the choir (and aimed away from the loudspeakers)
4. Move the mics closer to the choir (and/or further from the loudspeakers)
5. Use directional loudspeakers, placed and aimed away from the mics
6. Use parametric equalization
1. Turn it down: The simplest way to stop a mic from ringing feedback is to turn it down a few dB. Not real practical if the intent is to hear more of the choir in our PA mix.
2. Use fewer microphones: The lower the NOM (Number of Open Microphones) the better. In our application of choir miking, use the minimum number of cardioid condensers needed to cover the choir. This sounds better anyway, and increases GBF.
3. Use directional microphones aimed at the choir: Omnidirectional mics can sound great, but in many sound reinforcement applications they aren’t practical as they hear themselves in the PA more easily. Using directional microphones pointed at the choir with their nulls (least sensitive side) facing the PA effectively increases GBF.
4. Move the mics closer to the sources (and further from the loudspeakers): Less gain is now needed on these mics. And less gain means more GBF margin. Understanding Inverse Square Law is essential to several aspects of sound reinforcement theory.
5. Use directional loudspeakers, placed and aimed away from the mics: This function involves comprehensive system design and integration and is not the job of the system operator in installed systems - it might be in portable productions.
6. Parametric equalization: OK, so your choir and mics are behind the loudspeakers, you’re using a few good quality directional condensers, and you understand how to place and aim them correctly - but you still need the choir mics hotter in your PA mix without ringing. Console EQ may be used to carefully cut the feedback frequencies and maximize GBF. Let’s step through the classic method of “ringing out” these choir mics:
Mute all choir mic channels and flatten each EQ. Turn on whatever hi-pass filter is available on these channels. If it’s a switch, engage it. If it’s variable, set it to some reasonable starting place, such as 100 Hz or higher.
Turn on one choir mic. Slowly raise the fader (your EQ is flattened now, feedback may come earlier than expected) until just the first ring occurs at a modest level. Hold onto the fader and pull back before the ring “takes off”. It probably sounds like a pure tone. Determine by listening whether it is a low, mid, or high frequency ring (an RTA display makes a great visual aid for this). Let’s say it’s a hi-mid frequency ring. So we turn down a hi-mid EQ control maybe 6 dB or more to stop the ringing.
Slowly push the fader a few dB higher until the next ring occurs. Let’s say this is now a low mid frequency ring. We turn the low mid frequency control down several dB to tame it. Now we carefully push the fader further until it begins to ring a third time, and this is maybe a midrange ring. So, we turn down the mid frequency control until the ringing stops. (By the way, continuing this “ring - cut - push higher” approach will eventually produce ringing that is no longer a single tone, but several tones together – a chord of sorts. This method can easily be taken too far and ruin the sound).
repeat for each choir microphone channel.
OK - we just increased the GBF on the choir microphone with three rounds of ring-and-cut, right? Maybe awesome, maybe notsomuch... This method can sometimes work and sound ok, but we can do far better. Let’s look at why. Suppose that first hi mid ring looked something like this:

Note the ring is extremely narrow in frequency – centered right at about 5 kHz. And when we turned down the high mid frequency control, we achieved something like this in the channel amplitude response:

Hmmm. So we just cut the feedback and stopped it from ringing. But we also carved out an octave or more of this mic’s hi mid range because the filter has a fairly wide bandwidth (or medium Q). But we did meet our goal of stopping the feedback. That next ring low mid ring probably looked like this:

Again, the ring is very narrow, right at 250 Hz, and we turned down the low mid control on the channel EQ. Here’s what we’ve done to the audio signal at this point:

So, we just reduced that low mid frequency feedback maybe 7 or 8 dB, and we see the results of our EQ efforts thus far – a significant cut around 5kHz and another at 250 Hz. But we again reduced the gain of a much wider low mid frequency range than the actual feedback spike (250 Hz), because the filter we used is wider than the narrow feedback tone. That third, midrange feedback ring was at, say, 1 kHz:

So we turn down the midrange control on our channel EQ and now this is the result of what we’ve done with our channel EQ at this point:

Our choir mic can be turned up louder now without feedback. Great, but how does it sound? By “carving up” this choir microphone with medium bandwidth EQ filters, we have DRASTICALLY changed the tonal characteristic of the choir sound in the process of increasing GBF. We’ve taken away huge chunks of the sound we would probably like to hear. Yes, it is louder (without feedback), but it may sound really rough. It’s clear that we can benefit from cutting with much narrower EQ filters placed exactly on the feedback frequencies. So...
What is needed here is simply good parametric EQ. Some mixing consoles have fully parametric equalizers on each channel strip. Some have fixed-frequency EQ, while others feature “semi-parametric” or “quasi-parametric” EQ. These are major differences. Fully parametric EQ allows us to adjust three parameters: 1) filter gain (cut or boost), 2) center frequency, and 3) Q (bandwidth). Fixed frequency EQs have a fixed center frequency (and maybe Q). They are useful for tonal shaping, but not for feedback filtering without large side effects as they don’t allow the operator to adjust the frequency or bandwidth of the filter. Some consoles employ fixed frequency filters for the low and high bands, and semi-parametric midrange controls. Control of frequency and Q are necessary for properly preventing feedback.
So, in that first example where we cut the high mid frequency down, a parametric EQ would have allowed us to do this:

Note how this filter is considerably narrower than the broad cut we made at the same frequency of 5 kHz. If we use similarly narrow filters for those next ring tones (250 Hz and 1 kHz) the final result of our effort looks like this:

Big difference, as compared to the original result with broad filters! So our filters are centered at exactly the same frequencies as before, but because we have set their bandwidths to be extremely narrow, we’re now only cutting the feedback points, and very little of the sounds above and below. Here are the results again, side by side, for comparison:
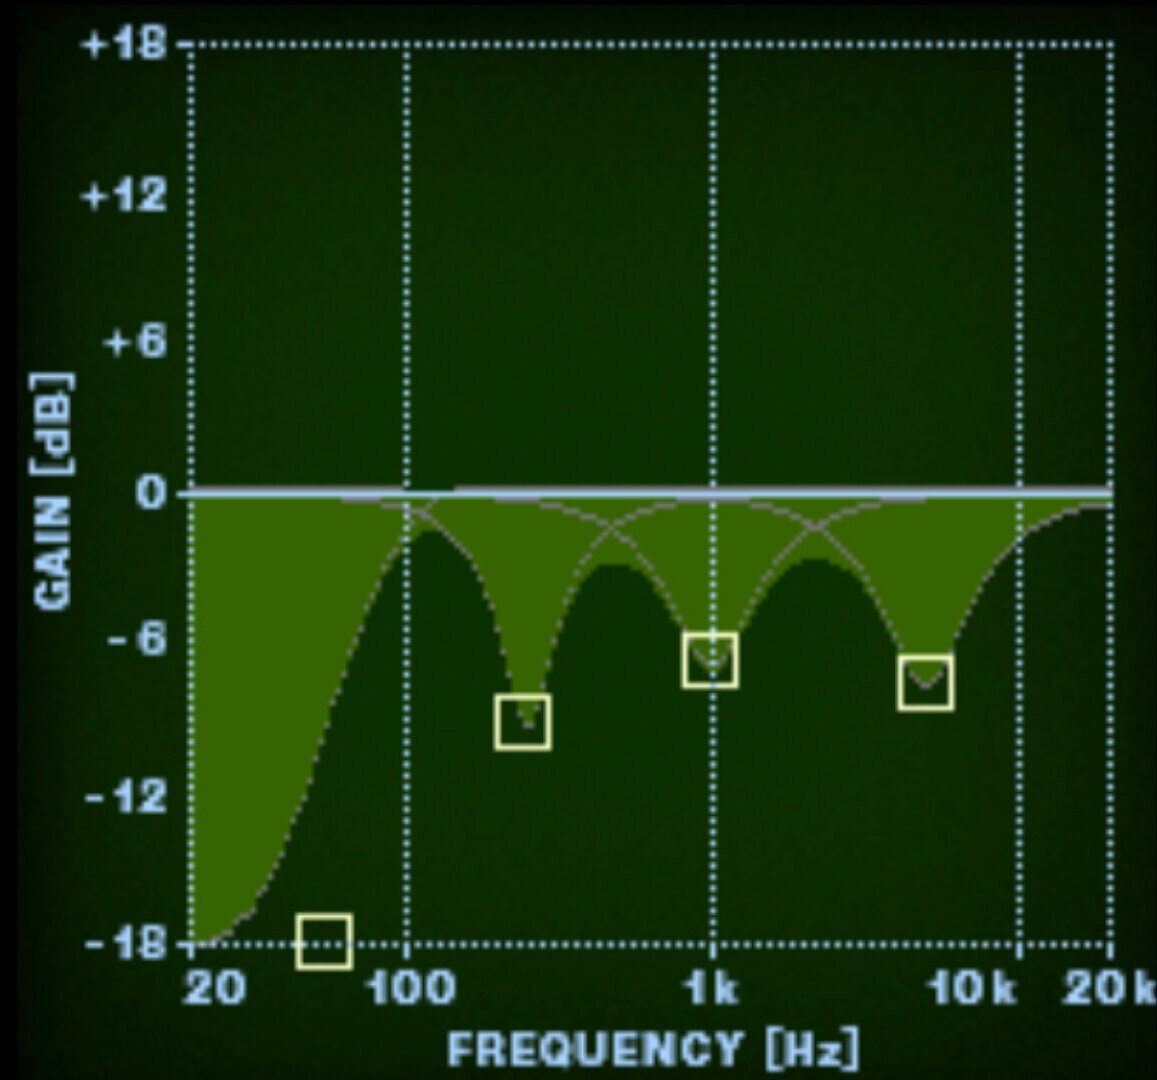

This improves GBF nicely and has little effect on the sound quality. This is a dramatic improvement over using medium or broad filters.
This technique requires practice. Cutting feedback frequencies with very exacting, narrow filters is tedious, but well worth the effort and gets easier with experience. Using parametric EQ to increase GBF is not specific to our choir example – it applies to any sound reinforcement miking application. If there is also a need for artistic, tonal shaping EQ adjustments, the EQ settings then become a careful and complex compromise – a balance of taste and required GBF.
Conclusions:
Any microphone in a sound reinforcement application will feedback if its gain is raised high enough. We can use proper microphone selection, directivity, and placement to maximize gain-before-feedback. In some cases, we still require more. Its always best to design the PA system with a greater PAG (potential acoustic gain) than NAG (needed acoustic gain), but if the operator needs more, console equalization is useful.
Once the physical variables are optimized, narrow EQ filters (essentially “notch filters”), achievable with parametric equalizers, are effective in further increasing gain-before-feedback without significantly degrading sound quality. If the mixing console has fully parametric EQ on its channel strips, great - just practice. If not, external parametric equalization may be inserted. For digital consoles, there are many 3rd party software plugin parametric equalizers on the market.
The ring-and-cut technique described here works best on fixed placement microphones, as portable microphones will feedback at varying frequencies based on their changing location and distance from loudspeakers.
Very narrow cut filters must be centered exactly on the feedback frequency, which requires care to find. A broader EQ filter is easier to adjust, and as long as it’s “close” it will help reduce feedback. But it cuts a wider range of frequencies than required, at the cost of reduced sound quality. Ear training, practice, and visual tools such as an RTA improve one’s ability to quickly identify and cut a specific feedback frequency with an appropriately narrow EQ filter.